반응형

개요
Reactive coding에서는 적절한 operation 사용이 필수 불가결이다.
이는 가독성을 높이고, Sequence를 효과적으로 구성할 수 있다.
하지만, operator는 종류가 많고, 복잡한 것들이 많기 때문에, 선택에 어려움이 있다.
이번 글은 상황 별 operator 가이드와, 예시를 제공하고자 한다.
Case 별 Operator 정리
Sequence 생성
| Operator | 상황 |
| just, justOrEmpty | 특정 Element 또는 Element들로 시작하는 Sequence 생성 |
| fromArray, fromIterable, range, fromStream | iteration 할 수 있는 Element들로 Sequence(Flux) 생성 |
| empty | empty한 Sequence 생성 |
| defer | subscribe 시점에 실행 |
| error | error 생성 |
Sequence를 생성하는 상황은 기본적으로 특정 Object 또는 여러 Object 를 기반으로 시작한다.
일반적으로 Object의 reference를 통해 생성하거나, Functional Interface를 람다로 구현한다.
Sequence에서 Transform
| Operator | 상황 |
| map | Sequence에 변동 없이 Object만 바꾸고 싶을 경우 |
| cast | Sequence에 변동 없이 Object Type만 바꾸고 싶을 경우 |
| flatMap | 다른 Sequence를 넣고 싶은 경우 |
| startWith, concatWithValues | element를 앞,뒤로 추가하고 싶은 경우 |
| collectList, collectSortedList, collectMap, collectMultiMap, collect, count, all, any… |
flux를 aggregation하고 싶은 경우 |
| concatWith, zip, zipWith, zipWhen | 다른 Sequence와 합치고 싶은 경우 |
| defaultIfEmpty, switchIfEmpty | empty sequence를 처리하고 싶은 경우 |
| then, thenEmpty, thenMany | sequence와 상관없이 다음 sequence를 만들고 싶은 경우 |
Sequence를 변경할 수 있는 방법들이다. 일반적으로, element 변경, 다른 sequence를 태우거나 합치는 방법들
위 Operator들은 기존 sequence의 변화를 준다.
Peeking
| Operator | 상황 |
| doOnNext doOnComplete, doOnSuccess, doOnError, doOnCancel doFirst doOnSubscribe, doOnRequest, doOnTerminate |
sideEffect를 통한 기존 Sequence에 영향을 미치지 않는 방식 각각의 실행 시점을 choose할 수 있다. |
| doOnEach, materialize log |
모든 signal에 대한 handling을 하고 싶을 때 사용하는 operator들 |
peeking은 기존 sequence에 영향을 미치지 않는 operator들로 여겨진다.
이 의미는 doOnNext를 skip하고 해석해도 기존 flow를 이해할 수 있어야 한다는 말과 같다고 볼 수 있다.
가령 doOnNext는 sideEffect를 통해 기존 sequence에 영향을 미치지 않는 로직이 들어간다고 생각할 수 있다.
따라서 doOnNext에서 객체의 속성을 변경하거나 하는 로직은 혼란을 야기할 수 있다.
자세한 사항은 후술
Filtering
| Operator | 상황 |
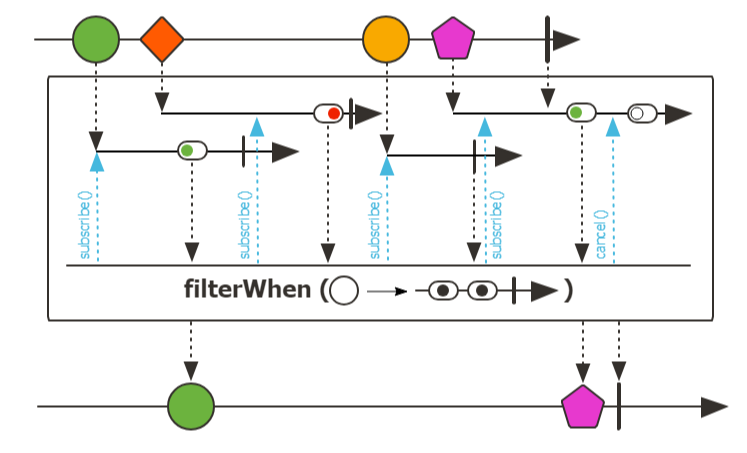
| fliter, filterWhen | 특정 로직을 통한 필터링 |
| ignoreElements, distinct, ofType take, takeLast, next elementAt, skip, single sample |
hard한 filtering으로 분류 된다. sequence의 element를 선택/filtering하는 방법 |
element를 필터링 하는 Operator들이다.
custom로직, 갯수, 시간, element 위치 등으로 filtering할 수 있도록 지원한다.
Error Handling
| Operator | 상황 |
| error | error signal을 발생 시킬 수 있는 operator |
| onErrorReturn, onErrorComplete, onErrorResume, onErrorMap | error handling |
| doFinally, using | error consume |
| retry, retryWhen | retry when error |
에러처리를 지원하는 operator이다.
권장사항은 에러처리를 try catch가 아닌 reactive하게 처리하는 것 이다.
Flux Split
| Operator | 상황 |
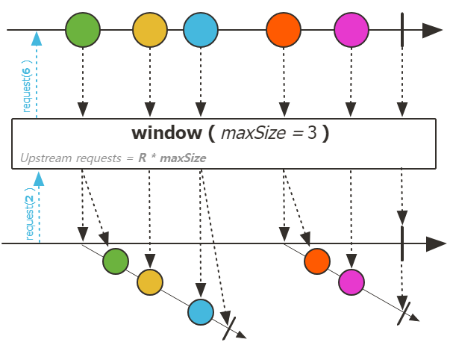
| window, windowUntil |  |
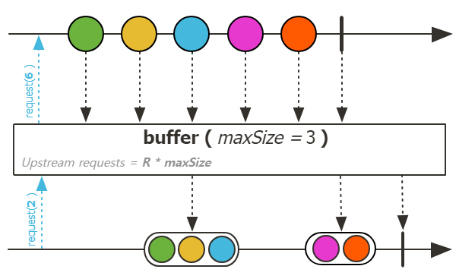
| buffer |  |
flux를 size 또는 duration으로 쪼개는 Operator들 이다.
Going Back to the Synchronous World
| Operator | 상황 |
| block, blockFirst, blockLast toIterable, toStream toFuture |
reactive에서 sync로 넘어가는 방법 |
Sync하게 Sequence 바깥으로 탈출하는 Operator들이다.
당연하게도 Sync로 넘어갈 수 없는 Scheduler에서는 사용할 수 없는 Operator들 이다.
Reactive Code Best Practice
Operator 단일 책임 원칙 (Depth 최소화)
하나의 Operator는 한가지 일을 해야한다.
주의:
Reactive code를 작성하다 보면, 뜻하지 않게 하나의 operator안에서 여러가지 비즈니스를 처리하게 된다.이는 co-worker 또는 시간이 지남에 따라, 읽기 힘들어지며, 유지보수성이 떨어지게 된다.operator의 depth가 높아지는 상황은 하나의 문장 안에 많은 내용을 집어넣는 것과 같다.
추천:
이를 해결하기 위해서 적절한 Operation 사용을 통한 로직의 분리, 라이브러리를 통한 분리하는 방법이 있다.이는 비즈니스의 문장들을 연결할 접속사를 다양하고 적절하게 사용해서, 가독성을 높이는 효과를 보이는 것이라 생각한다.아래 예시들은 depth가 늘어나는 상황을 적절한 operator를 통해 해소하는 방법들에 대한 것이다.
map(), doOnNext(), filter(), switchIfEmpty() 등 Example
흔한 비즈니스를 예제로 했다.
1. input 로깅
2. 특정 값으로 db 조회
3. 조회값 로깅
4. db 조회 된 값을 기준으로 REST 요청
5. REST 요청의 response code 200 검증
- 200이 아닐 시 custom error 생성
6. Res의 Z 값 리턴
// Before

public Mono<?> worstCase(final String id) {
  return Mono.just(id)
      .flatMap(xId -> {
        log(xId);
        return getXFromDB(xId)
            .flatMap(x -> {
              log(x);
              Req req = new Req(x.getYId());
              return getYFromRest(req)
                  .flatMap(y -> {
                    if (y.getResCode().equals("200")) {
                      return Mono.just(y.getZId());
                    } else {
                      throw new RuntimeException("rest error");
                    }
                  });
            });
      });
}

// After
public Mono<?> betterCase(final String id) {
  return Mono.just(id)
      .doOnNext(this::log)
      .flatMap(this::getXFromDB)
      .doOnNext(this::log)
      .map(x -> new Req(x.getYId()))
      .flatMap(this::getYFromRest)
      .filter(y -> y.getResCode().equals("200"))
      .switchIfEmpty(Mono.defer(() -> Mono.error(new RuntimeException("rest error"))))
      .map(Y::getZId);
}
element에 초점을 두고, 변화를 operator를 통해 표현하면 depth가 낮아지는 효과를 볼 수 있다.
비즈니스 로직을 순차적으로 호출하는 것이 아닌, element가 변화하는 방식으로 위 비즈니스를 해석하자면
1. xId를 기반으로 Sequence 생성
- (sideEffect) xId 로깅
2. DB 조회 로직을 통해 X Element로 변환
- X 로깅
3. X를 Req로 변환
4. REST 로직을 통해 Y (Res)로 변환
5. 200인 응답을 필터링
- 200이 아닌 경우 error signal 생성
6. Z 값으로 변환
depth를 낮추고 element 위주의 설계는 가독성 외 2가지 장점을 가진다.
1. 메서드를 분리하는 기준이 된다.
2. 로직의 추가/제거가 상대적으로 용이하다.
filterWhen() Example

cache에서 특정 id가 로그인 되어있는지 확인하는 필터를 추가하는 비즈니스가 추가 되는 상황을 가정했다.
public Mono<Boolean> checkLoginFromCache(final String yId) {
  ...
}
// Before
public Flux<?> filterWhenWorst() {
return this.getXListFromDB()
.flatMap(x -> checkLoginFromCache(x.getYId())
.map(isLogin -> {
if (isLogin) {
return Mono.just(x);
}
return Mono.empty();
}));
}
// After
public Flux<?> filterWhenGood() {
return this.getXListFromDB()
.filterWhen(x -> checkLoginFromCache(x.getYId()));
}한정된 Operator로 인하여 depth가 늘어나게 되는 대표적인 예시이다.
filterWhen Operator를 모른다면, 하위 Sequence로 X를 필터링해서 보내기 위해 flatMap으로 다른 Sequence의 결과를 기반으로 X Element를 다시 Sequence로 만들어야 한다.
filterWhen을 사용하면, 다른 Sequence(Flow)의 결과를 기반으로 현제 Sequence를 필터링 할 수 있다.
Zip(), ZipWhen(), ZipWith() Example

X Table에서 data를 조회하고, 그 값에 기반하여 Y Table을 조회하여 새로운 객체를 만드는 상황 예시이다.
이 예시는 Rest로 조회한 값과, DB 값을 합칠 때 같이 비즈니스 구성 시 많이 발생하는 상황이다.
// Worst
public Mono<?> zipWorst(final String id) {
  return getXFromDB(id)
      .flatMap(x -> getYFromDB(x.getYId())
          .map(y -> new Req(x, y)))
      .flatMap(this::getZFromRest);
}

// Good
public Mono<?> zipGood(final String id) {
  return getXFromDB(id)
      .zipWhen(x -> getYFromDB(x.getYId()))
      .map(tuple -> new Req(tuple.getT1(), tuple.getT2()))
      .flatMap(this::getZFromRest);
}

// Best
public Mono<?> zipBest(final String id) {
  return getXFromDB(id)
    .zipWhen(x -> getYFromDB(x.getYId()), Req::new)
    .flatMap(this::getZFromRest);
}
두 Sequence를 합치는 zip 관련 operator를 사용하지 않는다면, depth가 하나 늘어날 수 밖에 없다.
zip 을 통하여 명확하게 두 sequence를 합치는 것을 알리면서, depth를 줄일 수 있다.
Flux Zip with Default
public void zipWarning() {
  Flux<String> strFlux = Flux.just("1", "2", "3", "4");
  Flux<Integer> intFlux = Flux.just(1, 2);

  strFlux
      .zipWith(intFlux)
      .doOnNext(TupleUtils.consumer((s, i) -> System.out.println(s + " / " + i)))
      .subscribe();
}

>> 1 / 1
>> 2 / 2
Flux의 Zip 사용 시 주의 점으로
zip 은 두 sequence 중 하나라도 complete signal이 오면 zip operation이 종료되며, 나머지 sequence로 cancel signal을 보낸다.
위 예제처럼 intFlux의 element가 2개이기 때문에, strFlux의 “3”, “4”는 cancel 되었다.

Flux<String> strFlux = Flux.just("1", "2", "3", "4");
Flux<Integer> intFlux = Flux.just(1, 2);

strFlux
    .zipWith(intFlux.concatWith(Flux.just(-1).repeat()))
    .doOnNext(TupleUtils.consumer((s, i) -> System.out.println(s + " / " + i)))
    .subscribe();

>> 1 / 1
>> 2 / 2
>> 3 / -1
>> 4 / -1
해결 방안으로 concat을 활용할 수 있다.
concat은 complete signal로 다른 publisher에 연결된다.
이를 활용하여, repeat()하는 element create publisher로 default element처럼 zip해주면
default element를 생성하는 zip operation이 가능하다.
delayUntil() Example

Z를 result로 내보내야 하지만, 중간에 내부 속성인 x와 y를 DB에 update해야하는 비즈니스가 있다고 가정했다.
// Worst
public Mono<Z> delayUntilWorst(final Req req) {
  return getZFromRest(req)
      .flatMap(z -> updateXToDB(z.getX())
          .flatMap(x -> updateYToDB(z.getY()))
          .map(y -> z));
}

// Good
public Mono<Z> delayUntilGood(final Req req) {
  return getZFromRest(req)
      .delayUntil(z -> updateXToDB(z.getX()))
      .delayUntil(z -> updateYToDB(z.getY()));
}
sequence의 element를 유지하면서 다른 Flow를 처리하는 방법이다.
flatMap을 사용한다면, 부모 element를 밑으로 다시 넘기기 위해 depth가 늘어날 수 밖에 없다.
주의:
delayUntil은 내부적으로 생성되는 sequence가 flat하다.
따라서, Flux의 경우 element가 순차적으로 생성되는 Sequence 실행되기 때문에 성능 상 손해가 발생할 수 있다.
Tuple Library 활용
Tuple의 경우 Reactive Coding에서 활용성이 좋은 DTO지만, 가독성이 문제가 될 수 있다.
이는 t1, t2 등 내부 값이 IDE의 가이드 없이 확인하기 어렵기 때문이다.
이를 도와주는 Projectreactor의 addon Library가 있다.
Gradle
implementation 'io.projectreactor.addons:reactor-extra'Zip with Library
// Before
public Mono<?> zipGood(final String id) {
  return getXFromDB(id)
      .zipWhen(x -> getYFromDB(x.getYId()))
      .map(tuple -> new Req(tuple.getT1(), tuple.getT2()))
      .flatMap(this::getZFromRest);
}

// After
public Mono<?> zipWithLib(final String id) {
  return getXFromDB(id)
      .zipWhen(x -> getYFromDB(x.getYId()))
      .map(TupleUtils.function((x, y) -> new Req(x, y)))
      .flatMap(this::getZFromRest);
}

public Mono<?> zipWithLibGood(final String id) {
  return getXFromDB(id)
      .zipWhen(x -> getYFromDB(x.getYId()))
      .map(TupleUtils.function(Req::new))
      .flatMap(this::getZFromRest);
}
위 예제 중 zip 관련 예제이다.
코드로 보았을 때 map안의 tuple이 정확하게 어떤 객체로 이루어져 있는지 확인할 수 없다.
이를 function으로 풀어서 작성자가 보다 명확하게 표현할 수 있도록 도와둔다.
참고:
Kotlin의 경우 문법적으로 확장 함수, 구조 분해 등을 통해 가독성을 지원한다. ㅎㅎ
Use error() Operator
// 1. Success to handle Exception (Throw)
public Mono<?> handleErrorExample() {
  return Mono.just("ex")
      .flatMap(this::customError)
      .onErrorReturn("errorHandled");
}
public Mono<String> customError(final String x) {
  throw new RuntimeException();
}

>> onErrorReturn 동작


// 2. Fail to handle Exception (Throw)
public Mono<?> handleErrorExample() {
  return Mono.just("ex")
      .flatMap(s -> this.customError(s)
          .onErrorReturn("errorHandled"));
}
public Mono<String> customError(final String x) {
  throw new RuntimeException();
}

>> onErrorReturn 미동작


// 3. handle Exception with error() operator
public Mono<?> handleErrorExample() {
  return Mono.just("ex")
      .flatMap(s -> this.customError(s)
          .onErrorReturn("errorHandled"));
}
public Mono<String> customError(final String x) {
  return Mono.error(new RuntimeException());
}

>> onErrorReturn 동작
1번의 경우 flatMap에서 exception을 감지하고, error signal을 만들어 하위 flow로 넘기기 때문에 onErrorReturn이 처리된다.
하지만 2번의 경우 throw 된 Exception을 error signal로 변환하지 못한 상황에서 onErrorReturn이 호출되어서 error handling이 skip 되는 문제가 있다.
3번처럼 Exception을 error signal과 함께 생성하는 방식이, 문제 상황을 차단할 수 있다.
Conditional Flow Example
비즈니스를 구성할 때 자주 발생하는 상황으로 condition에 따른 로직 분기가 있다.
예로
1. a일 때 A 프로세스, b일 때 B 프로세스
2. c일 때 C 프로세스 추가
등이 있다.
일반적으로 분기를 통한 비즈니스 수행은 비즈니스 구성에 핵심적인 내용을 담은 경우가 많다.
1. Simple Conditional Flow
public Mono<String> conditionalFlow1(final String s) {
  return this.doSomeThing(s)
      .flatMap(condition -> {
        if ("a".equals(condition)) {
          return processA();
        }
        return process();
      });
}
심플하게 표현한 flow 설계 코드이다.
Depth가 많이 들어가서 안 좋은 코드로 보이지만, 위 방법이 잘못되지 않았다는 의견도 많다.
public Mono<String> conditionalFlow1A(final String s) {
  return this.doSomeThing(s)
      .flatMap(condition -> "a".equals(condition) ? this.processA() : this.process());
}
삼항연산자를 통해 위 if else를 한줄로 변경
public Mono<String> conditionalFlow1B(final String s) {
  return this.doSomeThing(s)
      .flatMap(this::processWithCondition);
}

public Mono<String> processWithCondition(final String condition) {
  if ("a".equals(condition)) {
    return processA();
  }
  return process();
}
위 Depth를 줄이기 위해, method를 분리했다.
분기 로직을 메서드로 분리하는 방식은 아래 장단점을 가진다.
장점: 비즈니스의 핵심인 분기 처리를 한 곳에서 관리할 수 있다.
단점: 비즈니스가 복잡해지면, 파라미터가 과도하게 많아지거나, 상위에서 defer를 통한 lazy 처리가 필요할 수 있다.
2. conditional with switchIfEmpty
public Mono<String> conditionalFlow2(final String s) {
  return this.doSomeThing(s)
      .filter("a"::equals)
      .flatMap(conditionA -> processA())
      .switchIfEmpty(Mono.defer(this::process));
}
switchIfEmpty Operator를 활용하여 분기를 처리하는 방법이다.
이 방식의 한계점은 switchIfEmpty 내부 로직이 상위 element를 받을 수 없다는 점이다.
ConnectableFlux Example
참고: https://p-bear.tistory.com/80
Manually
ConnectableFlux<String> source = sample2.sourceFromKafka()
        .delayUntil(sample2::doSomeBusiness)
        .map(sample2::mapRecordToObject)
        .publish();

source
    .publishOn(Schedulers.boundedElastic())
    .doOnNext(s -> printWithThread(" before A Server func"))
    .flatMap(sample2::restToAServer)
    .subscribe();
source
    .publishOn(Schedulers.boundedElastic())
    .doOnNext(s -> printWithThread("before B Server func"))
    .flatMap(sample2::restToBServer)
    .subscribe();

source.connect();

[boundedElastic-2] before B Server func
[boundedElastic-1]  before A Server func
[boundedElastic-2]  req B Server -> res B
[boundedElastic-1]  req B Server -> 1
[boundedElastic-2] before B Server func
[boundedElastic-1]  before A Server func
[boundedElastic-2]  req B Server -> res B
[boundedElastic-1]  req B Server -> 2
예시 비즈니스는 Kafka에서 받은 Record를 처리 후 여러 서버로 전파하는 로직이다.
ConnectableFlux를 활용하여 여러 Sequence에게 Element를 Hot하게 보내도록 구현했다.
위 예시는 특정 비즈니스는 한 stream에서 처리하고 이후 다른 구독자들에게 다른 scheduler를 적용한다.
with share()
Returns a new Flux that multicasts (shares) the original Flux. As long as there is at least one Subscriber this Flux will be subscribed and emitting data. When all subscribers have cancelled it will cancel the source Flux. This is an alias for publish().ConnectableFlux.refCount(). Returns: a Flux that upon first subscribe causes the source Flux to subscribe once, late subscribers might therefore miss items.
Sample2 sample2 = new Sample2();

Flux<String> sharedSource = sample2.sourceFromKafka()
    .map(sample2::mapRecordToObject)
    .share();

sharedSource
    .publishOn(Schedulers.boundedElastic())
    .doOnNext(s -> printWithThread(" before A Server func"))
    .flatMap(sample2::restToAServer)
    .subscribe();

sharedSource
    .publishOn(Schedulers.boundedElastic())
    .doOnNext(s -> printWithThread("before B Server func"))
    .flatMap(sample2::restToBServer)
    .subscribe();

System.out.println("next...");

sharedSource
    .subscribe(s -> System.out.println("main sub: " + s));

next...
main sub: 1
main sub: 2
[boundedElastic-2] before B Server func
[boundedElastic-1]  before A Server func
[boundedElastic-2]  req B Server -> res B
[boundedElastic-1]  req B Server -> 1
[boundedElastic-2] before B Server func
[boundedElastic-1]  before A Server func
[boundedElastic-2]  req B Server -> res B
[boundedElastic-1]  req B Server -> 2
깔끔하게 여러 subscriber를 Publisher에 적용하는 방법이다.
share() == publish().refCount()
이며, refCount()는 refCount(1)이며 최소 한 개의 subscriber가 있을 때 데이터를 제공하고, subscriber가 모두 cancel되면 상위flux(sharedSource)를 cancel 시킨다.
Cache Example

일부 비즈니스는 성능상의 이유로 값을 캐싱이 필요할 때가 있다.
가령 client_credential로 받은 하루짜리 토큰을 하루동안 사용해야할 때 등이 있다.
이때 cache()를 통한 mono, flux 캐싱이 유용하다.
public class TokenService {
  private final WebClient webClient;
  private final Mono<Map<String, Object>> tokenCache = this.cacheToken();

  public Mono<Map<String, Object>> getCachedToken() {
    return this.tokenCache;
  }

  public Mono<Map<String, Object>> cacheToken() {
    return this.getToken()
        .cache(
            tokenResponse -> Duration.ofSeconds(((Integer) tokenResponse.get("expires_in")).longValue()),
            throwable -> Duration.ZERO,
            () -> Duration.ZERO);
  }

  public Mono<Map<String, Object>> getToken() {
    return this.getTokenURIMono()
        .flatMap(this::requestToken);
  }

  private Mono<Map<String, Object>> requestToken(final URI uri) {
    return this.webClient
        .post()
        ...
        .retrieve()
        .bodyToMono(new ParameterizedTypeReference<>() {});
  }

  ...
}

// cache가 없을 때 token 요청
2024-02-02 14:06:38 INFO [reactor-http-nio-3] [65bc785efcfc05e5b31ab7066d150506,b31ab7066d150506] com.pbear.TokenService - create uri: https://...
2024-02-02 14:06:38 INFO [reactor-http-nio-3] [65bc785efcfc05e5b31ab7066d150506,b31ab7066d150506] com.pbear.WebClientConfig - Req 3rd > POST, URI=...
2024-02-02 14:06:39 INFO [reactor-http-nio-3] [65bc785efcfc05e5b31ab7066d150506,b31ab7066d150506] com.pbear.WebClientConfig - Res 3rd > 200 OK
2024-02-02 14:06:39 INFO [reactor-http-nio-3] [65bc785efcfc05e5b31ab7066d150506,b31ab7066d150506] com.pbear.TokenService - get Token: ce25ef3a-3ab5-4641-b9a5-faa91d9c603c
// 2,3번째 토큰은 cache로 부터
2024-02-02 14:06:51 INFO [reactor-http-nio-3] [65bc786bd274d9a444d2222fb7e82b8d,44d2222fb7e82b8d] com.pbear.TokenService - get Token: ce25ef3a-3ab5-4641-b9a5-faa91d9c603c
2024-02-02 14:06:53 INFO [reactor-http-nio-3] [65bc786d823d266fe3c0b70ec8d1cea6,e3c0b70ec8d1cea6] com.pbear.TokenService - get Token: ce25ef3a-3ab5-4641-b9a5-faa91d9c603c
위 구성은 최초 token 발급으로부터 expires_in 초 이후 cache가 삭제되는 로직이다.
cache()가 유지되는 동안 토큰발급 rest 요청을 하지 않는다.
이를 활용하면, 다른 library 도움 없이 기본적인 cache 로직을 구현할 수 있다.
Conclusion
java에서 Reactive 코드를 손과 머리가 닿는 방식으로 작성하면 차후에 수습불가능한 코드 덩어리가 생성된다.
최대한 다양한 Operator를 적절하게 사용하여 가독성을 높이는 작업은 생산성과 직결하는 사항이다.
특히 depth를 줄이는 것이 중요하다. 하지만, 과하게 줄이는 것도 문제가 있다.
때로는 코드의 줄이 늘어나는 것 보다는 깊이가 늘어나는게 좋을 때 도 있다.
최대한 많은 case를 살펴보고 정리해야
코드의 품질이 올라갈 수 있는 유일하고 정석적인 방법으로 생각된다.
REFERENCE
https://projectreactor.io/docs/core/release/reference/index.html#which-operator
https://d2.naver.com/helloworld/2771091
https://climbtheladder.com/10-project-reactor-best-practices/
https://tech.kakao.com/2018/05/29/reactor-programming/
반응형
'개발 일지' 카테고리의 다른 글
| [Kafka] Parallel Consumer (0) | 2024.03.19 |
|---|---|
| TURN Protocol (+ STUN Message) (1) | 2024.03.18 |
| Global Hooks And Context Propagation (Projectreactor Advanced Features) (1) | 2024.02.20 |
| Hot vs Cold Publisher (Projectreactor Advanced Features) (0) | 2024.02.19 |
| Clean Code in Reactive (1) | 2024.01.25 |